
You can manually trigger a shipping schedule configured in the BIMachine via a POST call to the API.
1. Application key 🔑
To start using it, you need to create an application key, see the step-by-step below or in more detail here:
- Access the Account Management menu.
- Click on New Application Key.
- Give the key a name.
- Copy the generated key.
This key will be used to authenticate future requests to the API.
2. Authentication token generation 🔐
With the application key, you can generate a user authentication token, which is needed to validate external access.
POST
<url_aplicação>/api/token-manager/?appKey=<chave_aplicação>

Request Body:
{
"email":"email@exemplo.com"
}
Expected Response:
{
  "id": 1,
  "applicationKey": {
    "id": 1,
    "name": "NomeDaAplicacao",
    "token": "chave_da_aplicacao",
    "account": {
      "id": 1,
      "accountOwnerId": 1,
      "accountMasterId": 1,
      "applicationKeys": null,
      "name": "NomeDaConta"
    },
    "blockByDomain": false,
    "allowedDomains": null
  },
  "user": {
    "id": 1,
    "username": "usuario@dominio.com",
    "email": "usuario@dominio.com",
    "preferredLanguage": "idioma_preferido",
    "displayName": "Nome de Exibição",
    "viewTutorial": false,
    "createObject": false,
    "addData": false,
    "preferences": {
      "id": 1,
      "defaultProjectId": 0,
      "defaultCockpits": null
    },
    "phone": "(00) 0000-0000",
    "projectLinks": null,
    "members": [1],
    "avatarLink": "/avatar?user-id=1&i=0000000000000&oi=0"
  },
  "token": "token_de_autenticacao"
}
The token generated is used to authenticate the user in BIMachine when used in other applications. This token is unique and expires in 30 minutes, but is renewed every time it is used.
Example JAVA code for token authentication:
public String getToken(){
try {
return new SimpleTimeLimiter().callWithTimeout(new Callable<String>() {
@Override
public String call() throws Exception {
String emailUser = "usuario@dominio.com";
String appKey = "chave_da_aplicacao";
RestTemplate restTemplate = new RestTemplate();
URI uri = UriComponentsBuilder
.fromHttpUrl("https://app.bimachine.com.br/api/token-manager")
.queryParam("appKey", appKey)
.build()
.toUri();
HttpEntity httpEntity = jsonEntity(new EmailToken(emailUser, appKey));
ResponseEntity<Token> responseEntity = restTemplate.postForEntity(uri, httpEntity, Token.class);
if (responseEntity.getStatusCode().value() == 200) {
return responseEntity.getBody().getToken();
} else {
return null;
}
}
}, 2, TimeUnit.SECONDS, true);
} catch (Exception e) {
e.printStackTrace();
return null;
}
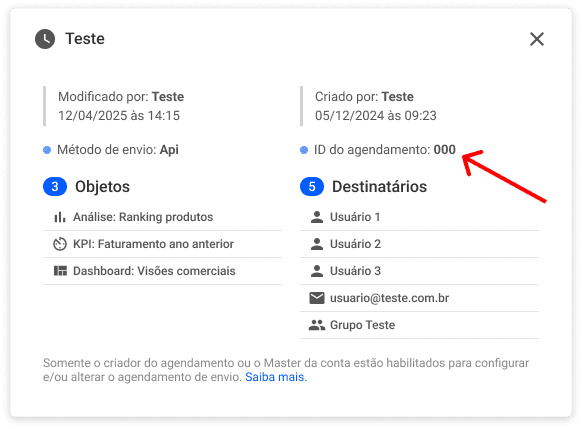
}3. Locating the schedulings ID
Before making the request, access the Schedules area on the BIMachine platform, access the details of the desired schedule and copy the ID as shown below:
4. Triggering the Schedule via API
Use the endpoint below to force the immediate execution of the schedule entered:
POST
https://api.bimachine.com/api/export/schedulings/{id}/run&appToken={appToken}
Parameters::
id: ID of the schedule that will be executed (obtained in step 3)- appToken: user authentication token (obtained in step 2)