
On this topic, check-out how to use filters in dashboards.
Login to BIMachine and open the dashboard where you want to configure the use of filters. Enable the editing of your dashboard, and in the tool menu on the right, click on the filter settings button, as highlighted in the image below:

Clicking on this button, you can then start configuring the filters to be used in your dashboard, using the following menu:

Here you start by configuring the placement of your filters within the dashboard, with these options:
Layout
Fixed: your filters will always be visible on your dashboard, you can choose whether to top or bottom
Floating: your filters will be on a floating bar on your dashboard, allowing you to collapse and expand. The positioning of the filter bar can be defined in four positions: upper left, upper right, lower left and lower right.
Also for floating filters, you can choose whether you want it to always start collapsed or expanded.
Filters
In the filters settings sub-menu, you must first select which filters will be available for use in your dashboard, as shown in the following screen:
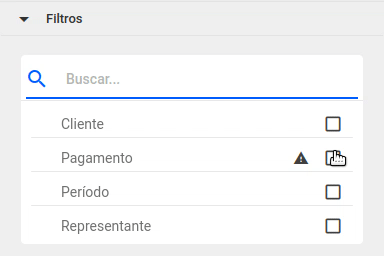
Simply check the filters you want to use on your dashboard and order them by clicking and dragging to the desired view, as shown in the previous image. Also note that some filters may be marked with an alert, which indicates that the objects you have on your dashboard, have no relation to the filter in question.
Filters – Individual settings
To configure the options for using a particular filter, click on the gear button, as shown in the following image:

When you click on the configuration, you will have the following configuration options:

In the data link configuration, you can choose between three options:
- Do not display members without data: this is the default setting for your filter, and it prevents members who do not have data linked to their dashboard from being shown, preventing the user from selecting a filter that will not return results
- Disable members without data: this option will not allow the filter members that do not have data linked to their dashboard to be selected, but will still show them
- Show all members: shows all members regardless of link to the information on your dashboard
You can also configure the options of fixed filters and mandatory filters, as follows:
- Fixed filter: when this option is selected, you can define a standard filter for your dashboard, which cannot be modified later by viewers
- Mandatory filter: with this option checked, when opening the dashboard it will always be necessary to select a member in the filter in question
Finally, in the previous screen, it is still possible to configure the restriction of members of your filter. When this option is enabled, you will be able to choose which members will be displayed for the user’s selection. This setting allows you to limit the filter options that can be applied to your dashboard.
Custom filters
With this configuration, you can define the behavior of each object on your dashboard when a filter is selected, choosing which filters you want to be applied or not. See the following screen:

Here you should customize the application of filters in cases where you want one or more objects on your dashboard not to be filtered when one or more of your filters are applied.
In the example in the image above, we have the Period, Client and Representative filters on our dashboard. On the dashboard we have a monthly evolution analysis, which shows the billing and volume values month by month.
In this case, if you want this analysis not to be changed when the user makes a Period filter, you can customize its filters.
Add this object to be customized, and then select which filters you want to be applied to it.
Important: if you select an object to be customized, but do not assign it the filters that should be applied, none of the filters on your dashboard will have an effect on it.